React Nativeのデバッガーについて調べてみる

デバッグとは?・・・プログラム内のバグを探し修正すること

デバッガーとは?・・・デバッグを支援するツールの総称


はじめは、ブラウザをChromeに絞って話します。

React Nativeのデバッグ方法の基本は、ChromeのDeveloper Toolsを使用することです。

Expoを使用し、アプリの開発途中で、Expo Goなどを利用して実機で試しているときに、スマホを振ると、メニューがでてくるので、『Debug Remote JS」を選択すると、PC側で、Developer Toolsを立ち上げることができます。


ほかには、React Nativeでも、React Developer Toolsが使用できます。

React Developer Tools – React

React DevTools · React Native


さて、Edgeでも全く同様にこれらはできます。

最近は、CopilotというAIが、プログラミングに有用であることは周知の事実ですが、

VSCodeのみならず、Developer Toolsにも連動するようになってきてます。

【AI搭載デベロッパーツール】が凄い!Microsoft AI/ChatGPT4でWeb開発が超簡単に! (youtube.com)

まだ使ってないので、これらを今後使っていきたいと思ってます。


WordPressページへ移行中 https://yuuzaki2022.com/

Dimensionsを使って、スマホを横にしたときと縦のときのレイアウトを変える。

Dimensionsを利用するときは、

import {View, Text, Dimenstions } from 'react-native'

のように記載して利用する。


まず、ドキュメントを読んでみよう。

そこのサンプルコードを利用し、スマホを縦にしたときと横にしたときに

レイアウトを変更するコードを作成してみる。

例えばボタンなんかでは、縦長では縦に並べたいが、横にしたときにも縦だと、ボタンが横長になりすぎたりするので、横に並べたいことがあるかと思われる。


app.jsonの 'expo'の'orientation'については、下記のようにしておく

"orientation": "undefined"


App.js

import React, {useState, useEffect} from 'react';
import {View, StyleSheet, Text, Dimensions} from 'react-native';

const windowDimensions = Dimensions.get('window');
const screenDimensions = Dimensions.get('screen');
const windowWidth = Dimensions.get('window').width;
const windowHeight = Dimensions.get('window').height;

const App = () => {
  const [dimensions, setDimensions] = useState({
    window: windowDimensions,
    screen: screenDimensions,
  });

  const [windowSize, setWindowSize] = useState({
    height: windowHeight,
    width: windowWidth,
  })

  useEffect*1}
      <Text style={styles.header}>Screen Dimensions</Text>
      {Object.entries(dimensions.screen).map*2}
     </View>
    </View>
  );
};

const styles = StyleSheet.create({
  container: {
    flex: 1,
    justifyContent: 'center',
    alignItems: 'center',
  },
  containerPortrait: {
    flex:1,
    flexDirection: 'column',
    justifyContent: 'center',
    alignItems: 'center'
  },
  containerLandscape: {
    flex:1,
    flexDirection: 'row',
    justifyContent: 'center',
    alignItems:'center'
  },
  header: {
    fontSize: 16,
    marginVertical: 10,
  },
});

export default App;
WordPressページへ移行中 https://yuuzaki2022.com/

*1:) => {

    const subscription = Dimensions.addEventListener(
      'change',
      ({window, screen, height, width}) => {
        setDimensions({window, screen});
        setWindowSize({height, width});
      },
    );
   
    return () => subscription?.remove();
  });

  return (
    <View style={styles.container}>
     <View style={ windowSize.height> windowSize.width ? styles.containerPortrait : styles.containerLandscape}>
      <Text style={styles.header}>Window Dimensions</Text>
      {Object.entries(dimensions.window).map(([key, value]) => (
        <Text>
          {key} - {value}
        </Text>
     

*2:[key, value]) => (

        <Text>
          {key} - {value}
        </Text>
     

React Native 関連のYoutube動画を調べる

(4) PC自作から始めるスマホアプリ開発 #8 React Native基礎編 ウェブAPIからデータを取得する - YouTube


Handling the Screen Orientation of React Native Apps Without any Third-party Packages (youtube.com)

これは3年前のもので、クラス型コンポーネントで行われてます。タイトルにもある通り、サードパーティのライブラリを使用せずに(つまり、react-native-orientation-lockerなどを使わずに)、画面を横にすると画面が横になるようにしています。


(4) Build and Deploy a React Native App | 2023 React Native Course Tutorial for Beginners - YouTube


React Native Tutorial #1 - Introduction (youtube.com)


他の動画にまどわされないYoutube動画視聴アプリの作成(車内用)

まず、ミラーリングについて説明します。

ミラーリングとは?

 純正ナビでスマホの画面を映したい場合にはいろいろ方法がありますが、

 どの種類の入力ポートがあるかにもよりますが、HDMI入力ポートを利用できるなら、ミラーリングを使用する方法があります。

 Wifi環境を構築し、スマホとナビがともにそのWifiにつながれていれば、ミラーリングが可能になります。


次に下記のHPの内容を参考にして、アプリを作成していきます。

(react-native-youtubeやreact-native-youtube-iframライブラリは使えなかったので)

betterprogramming.pub


react-native-youtube-iframeのように、プレイリストを渡すことはできなかった(可能かもしれませんがわかりませんでした)ので、

React Navigationを使用し、『1コンポーネントYoutubeコンテンツ』としました。


次に画面の向きを、スマホを動かしたときに変更したかったのですが、

react-native-orientation-lockerについても使用できず、

結局、横画面固定としてます。app.jsonの'expo'の中の'orientation'を、 'landscape'にしてます。

上記HPの通りに、iFrame.jsを作成し、次に、下記のようなScreenTemplate.jsを作成し、それをもとにそれぞれのYoutubeコンテンツを表示するコンポーネントを作成し、React Navigationで遷移できるようにしました。

ScreenTemplate.js 

import React, {useRef, useState } from 'react';
import {StyleSheet, View, SafeAreaView, Text, useWindowDimensions, TouchableOpacity} from 'react-native';
import WebView from 'react-native-webview';
import {buildHTML} from '../iFrame';

function ScreenTemplate({htmlId}){
    const webRef = useRef(null);
 
    const nextVideo = () => {
      //処理
      navigation.navigate("SecondScreen");
    }
 
    const windowWidth = useWindowDimensions().width;
    const windowHeight = useWindowDimensions().height;
 
    return (
      <SafeAreaView style={styles.container}>
        <View style={{width: windowWidth,height: windowHeight*2/3}}>
          <WebView
            ref={webRef}
            source={{html: buildHTML(htmlId)}}
            allowsFullscreenVideo={false}
            allowsInlineMediaPlayback
            scalesPageToFit={false}
            mediaPlaybackRequiresUserAction={false}
          />
         
        </View>
        <View style={styles.buttonContainer}>
          <TouchableOpacity style={{justifyContent:"center",alignItems:"center",width:"100%", height:60,backgroundColor: "orange"}}
                          onPress={nextVideo}>
          <Text style={{color: "white"}}>NEXT</Text>
          </TouchableOpacity>
        </View>
      </SafeAreaView>
    );
  };
 
  const styles = StyleSheet.create({
    container: {
      ...StyleSheet.absoluteFillObject,
    },
    buttonContainer: {
      flexDirection: 'column',
      width: '100%',
    },
  });
 
  export default ScreenTemplate;
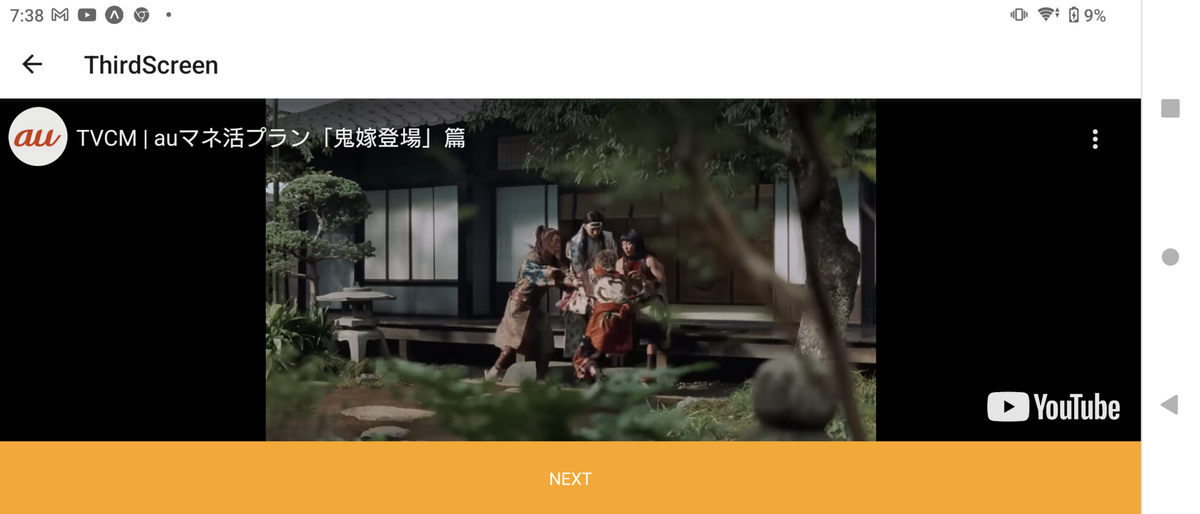


通常のYoutubeアプリと違って、画面のどこを押してもPLAY,PAUSEができます。

ピンチングで、10秒早送り、10秒巻き戻しは可能です。

進行バーを下に表示するには、プロパティを少し触るだけでできます。今回は不要なのでしてません。


演習20 ボタンに高さをつけたい

前回の用途で行くと、ボタンは縦横にできるだけ大きい方が、リモコン操作でカーソルを合わせやすいとのことで、React NativeでButtonコンポーネントをみると、heightを設定できないとのこと。

幅だけなら、Viewコンポーネントで挟んで、Viewの方に、widthプロパティで設定できるようだが、、、

縦の長さを長くするには下記HP参照

https://stackoverflow.com/questions/41777884/how-to-set-the-height-of-button-in-react-native-android/41778004#41778004


ということで作成してみました。

import { StyleSheet} from 'react-native';
import { Button, View, Alert, TouchableOpacity, Text} from 'react-native';
import { useState } from 'react';
import YoutubePlayer from 'react-native-youtube-iframe';


export default function App() {
  return (
    <View>
      <TouchableOpacity style={{justifyContent:"center",alignItems:"center",height: 100,width:100, backgroundColor:"blue"}}>
        <Text style={{color:"white"}}>My Button</Text>
      </TouchableOpacity>
    </View>
  );
}


WordPressページへ移行中 https://yuuzaki2022.com/

演習19 React Navigationを使用したアプリをビルドする


npx expo startするだけなら、依存するライブラリは不要だが、

ビルドするとなると以下のように、依存するライブラリのインストールと、babel.config.jsの修正・追加が必要です。

module.exports = function(api) {
  api.cache(true);
  return {
    presets: ['babel-preset-expo'],
    plugins: ['react-native-reanimated/plugin']
  };
};


npx expo install react-native-screens react-native-safe-area-context

npx expo install react-native-gesture-handler react-native-reanimated react-native-screens react-native-safe-area-context @react-native-community/masked-view


React Nativeそのものを使用しているなら、react-native-screensを使用した際に、いろいろなファイルの設定が必要であるが、Expoの場合は不要である。


それでも、ライブラリのバージョンの組み合わせがよくない場合があり、その際は、

npx expo install --fix とする。


なお、最近は、useNavigationや、useRouteというHooksが利用できるようで(React Navigation@6以上)、見ている限り複雑でなくすぐ移行できそうです


WordPressページへ移行中 https://yuuzaki2022.com/

演習14 Redux ToolkitでCounterを作成する

【Redux入門】初学者でも理解できるReduxの仕組みを解説します!(Redux Toolkitを使用) - YouTube

ひきつづき上記のYoutube動画を参考にして、React Nativeで作成してみます。


(プロジェクト名)/App.js

import { StatusBar } from 'expo-status-bar';
import { StyleSheet, Text, View, Button } from 'react-native';
import {store} from './redux/store';
import {Provider, useDispatch, useSelector} from 'react-redux';
import { increment } from './redux/counterSlice';

function ContainerApp(){
  const count = useSelector*1}
      />
    </View>
  )

}

export default function App() {
  return (
   <Provider store={store}>
    <View style={styles.container}>
      <Text>Open up App.js to start working on your app!</Text>
      <ContainerApp/>
      <StatusBar style="auto" />
    </View>
   </Provider>

  );
}

const styles = StyleSheet.create({
  container: {
    flex: 1,
    backgroundColor: '#fff',
    alignItems: 'center',
    justifyContent: 'center',
  },
});


(プロジェクト名)/ redux / store.js

import { configureStore } from "@reduxjs/toolkit";
import counterReducer from "./counterSlice";

export const store = configureStore({
    //Reducerを定義
    reducer: {
        counter: counterReducer,
    }
})


(プロジェクト名) / redux / counterSlice.js

import { createSlice } from "@reduxjs/toolkit";

export const counterSlice = createSlice({
    name: "counter",
    initialState: {
        value: 0,
    },
    reducers:{
        increment: (state) =>{
            state.value += 1;
        }
    }
})

export const {increment} = counterSlice.actions;
export default counterSlice.reducer;


※今回は、JS Debuggerからコードをコピペしてます。


*1:state) => state.counter.value);
  const dispatch = useDispatch();
  return(
    <View>
      <Text>{count}</Text>
      <Button
        title="+"
        onPress={() => dispatch(increment(